Installing fiber cement siding has never been more popular. Fiber cement siding is loved by contractors and homeowners alike for its long lifespan, high-end finishes, and sustainable properties. What’s more, fiber cement delivers outstanding durability and beauty at prices customers will love.
Both dealers and installers need to be familiar with this popular product. As fiber cement usage grows, more contractors and homeowners will want information on getting started with fiber cement on their next project.
Fortunately, Allura’s made it easier for dealers, contractors, and homeowners to decide how to choose and install Allura’s fiber cement.
How to Choose the Right Fiber Cement Product for Your Project
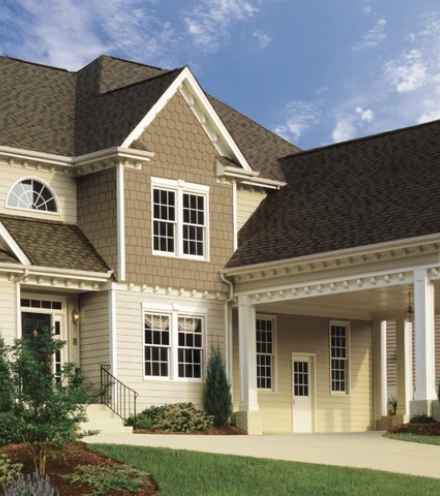
One of the significant benefits of fiber cement is its design versatility. Available in different finishes and colors, it offers flexibility to suit any property style. But as with any major home renovation project, homeowners will want reassurance from industry professionals when it comes to picking the right fiber cement siding for their home.
That’s where the Allura Visualizer comes in.
Planning Perfect Projects With the Allura Visualizer

The Allura visualizer is a powerful tool to help homeowners and professionals talk through fiber cement options. When a home renovation is still in the design phase, it can be hard to imagine how different options will look and what impact choices will have on the overall appearance and curb appeal of a home.
By using the Allura Visualizer, contractors can take the guesswork out of decision-making for their customers by showing them exactly how different finishes and colors will look. This, in turn, speeds up the project process from design to quote to installation.
The visualizer tool helps contractors to reduce the risk of expensive mid-project changes and increases the chance of a satisfied customer at the end of every project.
Using the Visualizer
To get started, navigate to the Visualizer page and select your state — this will give you accurate product options based on your location.
The easiest way to begin exploring options is to use Allura’s preloaded scenes. This selection of different house styles and types allows customers to try different colors, finishes, and combinations with the click of a mouse.

Once you’ve picked the home that best matches your project, click on the image to enter the visualization tool.

The tool provides the option to customize multiple features separately so that you can experiment with different styles, color combinations, and feature details, as shown on the left hand of the image above.
Such a tool makes bold decision choices effortless and allows you to see how changes look and feel on a home:

Working With Your Own Photos
Of course, each home is unique. How siding will look depends on multiple factors, including how it will match existing features (such as roof color) and the surrounding environment. Luckily, the Allura Visualizer tool also allows you to upload your photo to get a risk-free glimpse of how a renovation may transform the actual home.
Below, we have a beautiful home in need of a makeover for its exterior:

Image by WikimediaImages from Pixabay
With the Allura visualizer tool, it’s easy to imagine a new lease of life for this home. The first step is to click “Upload my own photo” and then crop the image.

Once you have your image ready, it’s time to define your wall areas using the interactive tool. There are help videos available every step of the way to guide you on the process.

For best results, think about defining the different areas of the exterior, including eaves, upper and lower floors, prominent features, etc. This will give you the chance to play with multiple colors and textures to find the perfect look.
Once you’ve defined the wall area, you’ll need to adjust the perspective using the perspective grid to follow the surface’s slope. You’re then ready to hit “Save and Visualize.”
Once you have defined your surfaces, the tool works the same way as it does for the preloaded scenes: you’ll be able to apply different colors and finishes to the surface to test out available designs, as you can see in the image below:

The visualizer tool gives contractors and homeowners the ability to test out their design vision — making it easier to find the best product and create a beautiful home exterior.
How to Install Allura Fiber Cement
Of course, selecting the product is only the first step in transforming a home. Re-siding a home is always a major project. Installing fiber cement siding has earned a reputation for being “difficult”— which may make some contractors or homeowners reluctant to work with it.
When customers are uncertain about whether or not they can handle a fiber cement installation product, you’ll want to be able to reassure them that the installation process isn’t as demanding as some may make it sound. In fact, professionals will recognize many similarities between the processes they use with other siding materials.
Use the tips and tricks below to highlight the ease of fiber cement installation and give insight into best practices.
Storage
Allura fiber cement siding should be stored flat, kept covered and installed dry.

Allura fiber cement comes with a travel bonnet to protect from dust and light moisture. But when the product may be sitting at the job site for a week and exposed to the elements, it’s critical to use an additional blue tarp to weatherproof the product.
Cutting the Product
When the time comes to install, contractors will need to cut the boards according to their installation plan. Always cut fiber cement boards face down to ensure clean lines and to avoid damaging the product.
Our experts recommend setting up a cutting table, ideally outside. Wear appropriate PPE at all times.
Allura recommends using a circular saw with a polycrystalline diamond-tipped blade when cutting, as this will create less dust than miter saws or carbide-tipped blades.
Before installing Spectrum pre-painted boards, reseal the raw edges of the cut board. Allura provides paint and an applicator to accomplish this task.
Installing the Boards
The installation process itself will be familiar to anyone who has worked on a siding project before, although there are some crucial differences.
When working with a traditional, horizontal lap pattern, the installation will start from the bottom up. Take special care to include clearance from the grade per the installation instructions or local building codes (whichever is greater).
Having the right tools for the job will make a world of difference. While Allura fiber cement siding can be hand nailed, using a pneumatic nailer (with the pressure set to 80-85 psi) will make the installation faster and easier. Never use framing nail guns, finishing nail guns, or staplers to install fiber cement.
Allura recommends the following process when installing panels:
- Blind nail the panels for the best finish (NB: 12-inch lap siding requires face nailing of the panels).
- Pay attention to nail placement: nails should never be closer than ⅜” to the edge of the board and ideally should be placed 1” from the top of the siding.
- Use galvanized nails or stainless steel, and don’t overdrive the nails — keep them flush or “proud” to the face of the siding.
- Place a 6” wide flashing strip behind each butt joint to allow for water runoff.
- Leave ⅛” around trim locations such as window heads, doors, etc., to allow for the natural expansion and contraction of materials and for the long-term settling of the home.
- Flash above all horizontal terminations and then caulk vertical gaps between the installed siding and the trim.

Painting and Caulking
When it comes to getting that perfect finish, it’s important to use high-quality acrylic latex paint or stain. Never use oil-based paints or stains.
For caulking, we recommend using high-quality exterior-grade caulk or sealant that meets ASTM standard C-920. Choose color-matched products or a paintable caulk, and ensure that the product is compatible with both the siding and trim materials.
Before starting their next project, professionals will want to review Allura’s comprehensive installation instructions with complete technical specifications, safety advice, and tips for ensuring a beautiful finish. Installers should also check all relevant building codes before starting work to ensure compliance with local regulations.
Ready to Begin?
Discover Allura’s wide range of fiber cement siding and supply your customers with a beautiful, long-lasting product at prices they’ll adore.
Click here to access the complete installation guide. Or click here to register for Allura's master Installation Training!